2021 DIY Dog Ramp
For those of you who have an aging dog, its likely that you have investigated steps or ramps to assist them in accessing chairs, couches and beds. There are several options available for purchase. However, I thought this might be a simple project to undertake, using basic wood material and carpeting.
Design
As with most of my home projects, I first start by modeling on the free web modeling software - SketchUp. My plan was to construct this ramp using 2x2's, plywood, and carpeting.
1st decision to make - steps vs. ramp. I opted to go with a ramp, as it is simpler in design & fabrication, and it likely would be easier for our dog to use (Our dog is a smaller one ~15-20 lbs).
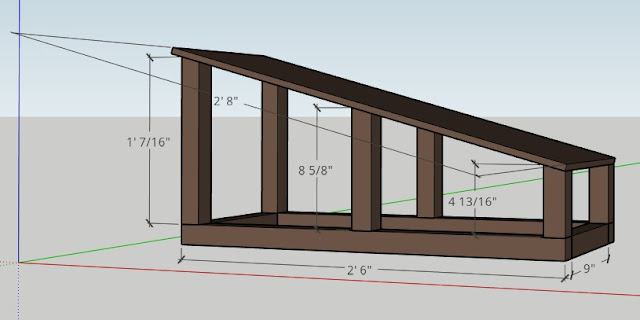
Next decision - size. I needed to determine a physical size that would a) be high enough to access furniture surfaces the dog uses, b) big enough for the dog to climb, and c) utilizes common material sizes to minimize cuts. We currently have some small "footstools" that the dog has used to get up a chair and the bed, so I used that height (~ 15") for the ramp. For the width, I decided using 12", or half of the width of a 2' x 4' sheet of 1/2" plywood. Finally, the length. This was the tricky dimension. Too steep an angle, and the dog would still experience jolts on the front legs when climbing down. Too flat an angle, and the ramp would be long, and likely a trip hazard for "us humans". My final decision was actually based on the size of a floormat that I was going to attach to the surface of the ramp. The floormat was 20" wide x 32" long. So I went with 32" long. Combining all these factors, the ramp was to be 32" long, 12" wide, and 15" tall, with a slope of 20 degrees.
The final design on SketchUp looked like this:
Materials
The bill of material included:
- 2 - 2x2 - 30"
- 2 - 2x2 - 9"
- 2 - 2x2 - 12-7/16"
- 2 - 2x2 - 8-10/16"
- 2 - 2x2 - 4-13/16"
- 1 - 12x32" (1/2" Plywood)
- 1 - 20x32 (carpeted door mat)
I purchased:
- 2 - 2x2 - 96" (pine) (~$6.00)
- 1 - 24x48 (1/2" plywood) (~$9.00)
- 1 - 20x32 carpeted floormat ($8.00)
Construction
Ramp - Cut ramp out of 1/2" plywood. Since a 2'x4' piece of plywood is is actually 0.472" x 23.75" x 47.75", I measured 12" from one edge and cut the length of the plywood. Next, I cut the length of the 12" piece to 32".
Base - The 2x2 pieces for the base (2-30" and 2-9") were cut on the miter/chop saw.
Supports - The supports were cut to the lengths listed above (12-7/16", 8-10/16", and 4-13/16"). Next, one end of each piece was then cut at a 20 degree angle to mate up to the angled ramp.
Assembly - All the joints were attached using 3" deck screws (with "star" heads). 1st the base was assembled (2-30" & 2-9" pieces). Then, the support pieces were positioned at both ends and fastened with deck screws. The final support pieces were positioned in the middle of the 30" long base pieces, and attached with deck screws. The 12" x 32" plywood sheet was positioned on the 6 support legs, and attached with 1-1/2" "star" head screws.
The final assembly component was the carpeted floormat. Since the floormat width was 20", I folded 4" from each side under the floormat, leaving a 12" wide strip of carpet. After positioning on the plywood, I used a staple gun and attached the carpet the top edge, bottom edge, and both side edges.
That's it! After spending about an hour designing the ramp on SketchUp, and hour running to the big box store to get the materials, and then another hour to cut pieces and assemble, I had a dog ramp. Note in the photo I have not painted the base. I figured I'd hold off until the dog used it enough, and I didn't need to modify the design. I plan on using gray spray paint (painting outside - a challenge in January in Iowa).


Comments
Post a Comment